Saturday, June 29, 2013

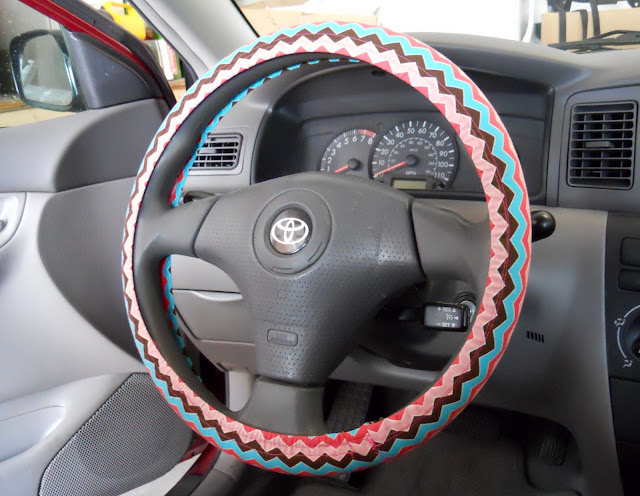
DIY Steering Wheel Cover

The idea to make my own steering wheel cover has been floating around in my head for quite some time.  I don’t like how covers you buy from the store always smell like an auto parts store and end up making the car also smell like an auto parts store.  Plus they are always black or gray or brown, which aren’t exactly the cutest colors out there.

I also wanted a cute new steering wheel cover because I am borrowing my parent’s car while they are living out of the country and I wanted to add some of my own flair to the car.  (I don’t think they would appreciate me slapping some bumper stickers on it, even though that would jazz things up.)  Plus the one already in the car is that pleather material that burns your hands if it’s hot, which it often is.

I never made one, though, because I thought it would be hard to do.  Well I am happy to report that it is not hard at all, and in fact this turned out to be a really quick and easy project.


Check it out!  Cute, soft, unburnable, and free of auto parts store smell.  Success!

Now that you’re super pumped to sew your own steering wheel cover, here’s what you need:


Fabric:  I used cotton fabric.  The amount you need depends on the size of your steering wheel so measure that first.  I also used some fleece to make the cover cushy.

Elastic:  I used ¼ inch elastic. 

First you need to measure your steering wheel, like so:


It was rather difficult to get a shot of this with one hand while trying to hold the tape on with the other hand, but what I do for my readers! 

Make sure your measuring tape is nice an tight so you get the right measurement.  If you make it too long the cover could be baggy.  Add ½” for seam allowance.

You also need to figure out the width of the cover, so measure the steering wheel again like so:


After measuring add ½” to 1” seam allowance, depending on how big your elastic is.

For my steering wheel, the measurements were 40” long and 4 ½” wide (that includes both seam allowances.)

After getting your measurements it’s time to cut out the fabric.  Just cut a single strip in the length and width you need.  Then cut a strip of fleece to the same length, but take ½” off the width.

Next, fold and press the sides of the fabric strip to make a casing for the elastic to go through.  I folded mine over ¼” and another slightly over ¼”.


Pin down and sew the casing on the inner edge.


Next, take the fleece and sew it down to the back of the outer fabric.


If you want to make it extra cushy, sew down a double layer of fleece.

Now it’s time to put in the elastic, which I never enjoy doing.  First, cut two pieces of elastic that are the exact length of your steering wheel, in my case it was 39 ½”. 

Attach a safety pin to both ends of the elastic and start pulling it through the side tube you made earlier.


Once you get it through (hooray!), sew down one end of the elastic to keep it in place.


Repeat on the other side of the cover.

Once both sides have the elastic in, fold the cover in half with right sides facing, and sew the edges together.


Trim it down, the flip it over and sew down a zig-zag for some extra support.


And that is it!  Now all you have to do it pop that baby on your steering wheel and start looking cool!


If it’s too baggy, just sew the ends together further down.  If it’s too tight and doesn’t fit, run back to your sewing room to try again! 

I’m loving this new cover, it makes me smile every time I get in the car.
Hope you it try it out!  Thanks for reading!


Thursday, May 23, 2013

Martha Makes: Blueberry Fool


Blueberry Fool – probably the easiest dessert I’ve ever made (especially coming from Martha Stewart!) 


At its bare bones, this is just whipped cream swirled with blueberry puree.  I had never heard of a fruit fool before, and according to Wikipedia it traditionally is custard swirled with fruit puree.  Making whipped cream is easier than making custard, so I approve of this version.

This was super easy to make and just seemed to be a perfect summer treat.  Want to try this?  (Of course you do!)  The recipe is on Martha Stewart’s website.  I’ll show the steps below.

First you make a blueberry puree (or really any berry would be good in this) by boiling blueberries with some lemon juice, sugar, and cinnamon.  Then puree it in a blender and strain the liquid out using a fine mesh strainer.


If you don’t have a mesh strainer you could use cheesecloth.  And if you don’t have cheesecloth or a mesh strainer then Martha is disappointed in you.

Stir the puree to get all the liquid out, leaving just the solids being in the strainer.


I just threw the solids away, which seemed like a waste.  Next time I’ll save them to add to yogurt or oatmeal or something.  Refrigerate the puree for an hour, then make the whipped cream. 

Homemade whip cream is so yummy, yet I never seem to get the consistency I want.  For this you’re supposed to whip heavy cream and sugar until soft peaks form.


I settled for soft blobs.  Then drizzle on the blueberry puree and swirl it together.


Refrigerate it for at least 2 hours, or overnight to get a more mousse-like texture (according to the recipe).  We are impatient for our desserts round here, so we had some right at the 2 hour mark.  It tasted delicious, but was somewhat soupy.  I had some more the next day, and while it had definitely firmed up, it certainly wasn’t mousse-like.


I think this would be so good on top of some shortcake, or served as a dip with some fresh fruit or cinnamon chips.  So even though mine didn’t end up looking anything like Martha’s, it was still delicious and I will definitely be making this one again.  Thanks Martha!


Tuesday, May 14, 2013

Anthropologie Inspired Fringe Bag


Anthropologie is one of my favorite stores.  I always feel inspired after shopping there, and usually come away with thoughts of how I could recreate on my own something I saw in the store.  And also usually a new cup or plate or bowl.  

Much as I love their clothes and accessories though, they are a bit out of my price range.  A few months ago I got their catalog and instantly fell in love with this tote bag:


Until I saw the price tag:


Yeah, it’s real leather and all that, but jeez, I could buy a lot of fabric and yarn for $300 dollars!  (This is actually on sale on their site right now for $100 off, still too much for me)  But I really liked the look of the ombre fringe on this bag, and I knew that I could figure out a way to recreate it.  Put my creative hat on and voila:


This actually turned out pretty awesome.  I love when that happens!  Yeah, the fringe isn’t a perfect ombre, but close enough for me!


I used suede for the outer fabric to give it a pseudo-leather look.  (Or should I say a suedeo-leather look, ha ha.) I bought the fringe at Joann’s; I don’t know what kind of fabric it is.  It is almost a little paper-ish.  I dyed it to get the colors I wanted. 


Cotton lining complete with some handy pockets.


I really like how this turned out.  The fringe is bouncy and fun, and I love the colors of it.  It’s perfect for summer.


Want to make your own?  Of course you do.  But, I may have been a bit lazy this time and didn’t write up a full tutorial on how to construct the bag itself, just some tips on how to do the fringe.  I just made a simple tote bag and sewed the fringe on to the front panel.  You could even just add some fringe to an existing boring bag to jazz it up!


To get the ombre look on the fringe I dyed it using Rit Dye.  The fringe itself was a little brown, so first I soaked it in some Rit Color Remover.  This step was crucial to getting a good color.  My first dyeing session I didn’t bleach it first and the color came out more green.  Bleaching first let the true color set it.


What a difference!  The bottom fringe is the unbleached one, and bleh, what a gross color.  To get the ombre look I used two different color dyes (Aquamarine and Navy Blue) and soaked the different strips for ½ hour to get the lighter color and 1 hour for the darker color. 


The color gradation isn’t as obvious as I had hoped for, but still fine.  After soaking these, make sure they are laying completely flat to dry.  If the fringe dries tangled up it stays that way and looks all wonky.


The dying part was long and annoying, but once that was done I quickly sewed the bag together and was on my way with my new awesome bag!


Just chillin’ at the river.  And yes I did match my pants to my bag. 


Cause I’m cool like that!

Thanks Anthropologie for the inspiration!


Monday, April 22, 2013

Chocolate Pecan Mini Pies


Back in California there was a local bakery that sold yummy little mini pies, and their chocolate pecan pie was the best thing ever.  Seriously, eating one of those little pies was otherworldly, they were so good!  It was a sad, sad day for me when they stopped making them.  Which is why I was super excited a few weeks ago to find a bakery in Albuquerque that also made mini chocolate pecan pies. 


I eagerly bought one, expecting the same deliciousness of the pie from California, when I spotted a crucial word on the label: green chili.  Yes, this was a green chili chocolate pecan pie.  (Green chili is seriously in everything here.)  No matter, I thought.  Chocolate will win this battle and it will still be good.  And yes it was good.  But it was not epic.  I like green chili as much as the next person, but in my burrito, not in my chocolate!


As I shook off my disappointment, it occurred to me that rather than try to find that elusive perfect pie, why don’t I make one myself!  Fate was on my side, as a few days later I spotted a tartlet pan on clearance at Target.  (Mmm, tartlets.  Tartlets.  Tartlets.  An internet high five to whoever gets that reference.)


I searched online and through my cookbooks for a chocolate pecan pie recipe, but I couldn’t find one that seemed right.  Finally I decided to take my mom’s pecan pie recipe and just add chocolate.  (Seems simple, but I was surprised by all the weird or complicated recipe’s out there.) 


Now my mom’s pecan pie recipe is really just Dear Abby’s Famous Pecan Pie recipe (which is the best one in my opinion.)  I think what makes it so good is that it uses brown sugar instead of white, which just gives it a little extra yumminess.  I just took that recipe and added melted chocolate, and the result was even better than I expected!  These were some seriously yummy pies!


The recipe makes 12 mini pies or one 9 inch pie.  After I made these my husband said we should freeze them since we wouldn’t be able to eat 12 pies before they went bad.  Um, no.  These suckers were gone in about 5 days.  They looked so cute displayed on my purple dessert stand that I thought about inviting people over to partake, but in the end I kept all the yumminess for myself.  Guess I’ll just have to make some more!


I made the crust from scratch, because you cannot beat homemade pie crust, but you can use store bought crust too.  I also experimented a bit on the type of chocolate I used.  I made pies using dark chocolate, milk chocolate, and semi-sweet chocolate.  And really there wasn’t much difference, but I think the dark chocolate was slightly richer, so that’s my recommendation. 

Now that you just cannot wait to make your own, here’s the recipe:

Chocolate Pecan Pie, adapted from Dear Abby’s Pecan Pie

1 9-inch unbaked pie crust
1 C. light corn syrup
1 tsp. vanilla
3 eggs, slightly beaten
1/3 C. butter, melted
¼ tsp. salt
1 C. firmly packed brown sugar
½ C. dark chocolate chips
1 heaping C. pecan halves

Preheat the oven to 350. 

In a large bowl, combine corn syrup, vanilla, eggs, butter, salt, and brown sugar.  Mix well.  Melt the chocolate in the microwave in 20 second intervals, stirring after each one until chocolate is smooth.  Add to the bowl and mix well.

To make one 9 inch pie:  Roll out crust dough and place it in a 9 inch pie dish.  Pour in the pie filling.  Arrange the pecans on top in an attractive manner.  Bake for 45-50 minutes or until center is set and toothpick comes out clean.  The pie will puff up during baking, but will deflate as it cools.

To make 12 mini pies:  Roll out crust dough and cut out 12 circles.  I used a mug that was the same size as the tartlet pan to cut out my circles.  You can also add leftover dough to make more of a crust edge.  Fill each pie well ¾ of the way full.  Add the pecans.  Bake for 40-45 minutes, or until toothpick comes out clean.  Let cool in pan for 15 minutes before taking out.

If you make the mini pies, don’t overfill the pie wells, or you will get this:


Hardened, crystalized pie filling that will rip your teeth out if you try to eat, which I may have tried to do.  My second attempt was better:


These were seriously so good.  And this recipe is very simple and easy, my favorite kind!  Top these off with some whipped cream, and I guarantee they won’t last long!


Now I shall never want for a delicious chocolate pecan pie again!  Hope you try these out!  Thanks for reading!


Thursday, April 11, 2013

Hair Towel Wrap Tutorial


Today’s project is quick and easy.  For a while I have been wanting a new hair towel wrap, the kind that are held in place in the back with a button.  If you don’t know what I mean, one of these bad boys:


Lovely bathroom shot.

I have a towel wrap that I’ve had for over 13 years.  And it was a hand-me-down from my sister, so who knows how old it actually is.  It still works just fine, but the fabric is pretty worn and getting that weird crunchy-towel feeling that doesn’t go away when you wash it.  Gross.

I’ve never actually seen one of these things in a store though, so I knew I had to make one myself.  (Although they probably sell these in beauty supply stores, which I never go to.  But it’s more fun to make something than buy it anyway!)  I had some bright yellow towel fabric that I got a Joann’s a long time ago for another project, so I pulled it out and whipped this up in less than an hour!

Want to make your own?  Here’s what you need:


Towel Fabric:  You can use an old towel or buy fabric at Joann’s.  Or find some clearance towels on a Target end cap.  You just need to have enough fabric to make two pieces that are 27” long and 9 ¾” wide.  (So if you are using old towels that are standard size, you will probably need two.)

Cord:  Or sturdy yarn.  You will need 6 ½”.

Button:  Dig through your stash and find an awesome button to add some flair to your head wrap.

Okay, let’s get started!

First you need to make a pattern for your head wrap.  I used my old one and drew out a pattern on paper, but it is an easy enough shape that you can recreate it on your own.  Here’s what it should look like:


To make your own, draw a straight line that is 27” long.  From the center of that line measure down 9 ¾” and make a mark.  Then draw a curve from that center point up to each end of the long line.  In the picture you can see that the left side is a narrow curve, while the right side is a wide curve, so make sure you draw it out like that.

Once you your pattern cut out, use it to cut out two pieces from your fabric.  Lay your fabric together and pin along the curved side of the fabric.


Then just sew along that curve leaving a ¼" margin.  I sewed a straight line, then went back and sewed a zig-zag in the margin, just to keep it from unraveling and spitting out little towel bits.  Which, by the way, you will get all over the place while you are making this, especially noticeable if you are wearing black sweatpants.


Once you are done with that, lay the wrap down on your work table and open it up, wrong side facing you.  Take your piece of cord, fold it in half and pin it to the narrow point of the wrap.  (Remember, one end has a narrow curve, the other end a wide curve.  Pin it to the narrow end.)


Make sure you pin it right where the two sides meet.  Sew that down.

Next you need to hem the whole outer edge.  To make sure you don’t have any loose ends showing, fold the edge over slightly, then fold it again and pin it down.


Pin the whole way around and then sew it down.  I used the zig-zag stitch again so that the edge would lay nice and flat.  The cord should also be folded down, just sew right on over that.


Then just fold it back up and stitch it in place.


And just ignore the wonkiness, it looks fine even if it isn't perfectly straight.  The finished end should look like this:


Almost done!  Just take your button and hand stitch to the other end of the towel, on the wide curved end right where the two fabric’s meet.


And that’s it! 


You are done and ready to rock that head wrap!


Yes I know I’m awesome.  Here’s a shot of the back:


Now I have nice soft and fluffy new hair wrap!  This is a great project for beginner sewers, nice and easy!  I hope you try it out!  Thanks for reading!