Monday, February 18, 2013

Finger Knitting Tutorial


Looking for a quick, super simple, and mindless craft?  You have found it in finger knitting!  You use your fingers and yarn to create a long chain that looks like this:


When I was a kid and my mom needed to keep us quiet during boring things, she would pull out a stash of yarn and let us go to town.  I would knit a chain longer than me using a whole skein, and then wrap it all around me like a scarf or necklace.

Now, you may be thinking, cute story, but what would I do with a long chain of yarn?  Honestly, not much.  But, how 'bout instead of yarn you used leather strips?  Bedazzle that up and you’ve got yourself an awesome bracelet, or necklace, or belt!


Pretty stylin’ right?

This tutorial will teach you how to finger knit, then tomorrow check back to see how I turned it from kid craft to runway chic!

This tutorial has a lot of pictures, but that’s to help you get it down!  This really is an easy craft and even young kids can do it.  So grab a ball of yarn to practice and let’s get started!

First let’s set things up.  You'll be working straight off the ball of yarn, so no need to measure out a length.  Tie the end of the yarn around the thumb of your non-dominant hand.  (I’m right handed so I used my left hand.  Use whatever hand is comfortable for you, the process is the same.) 

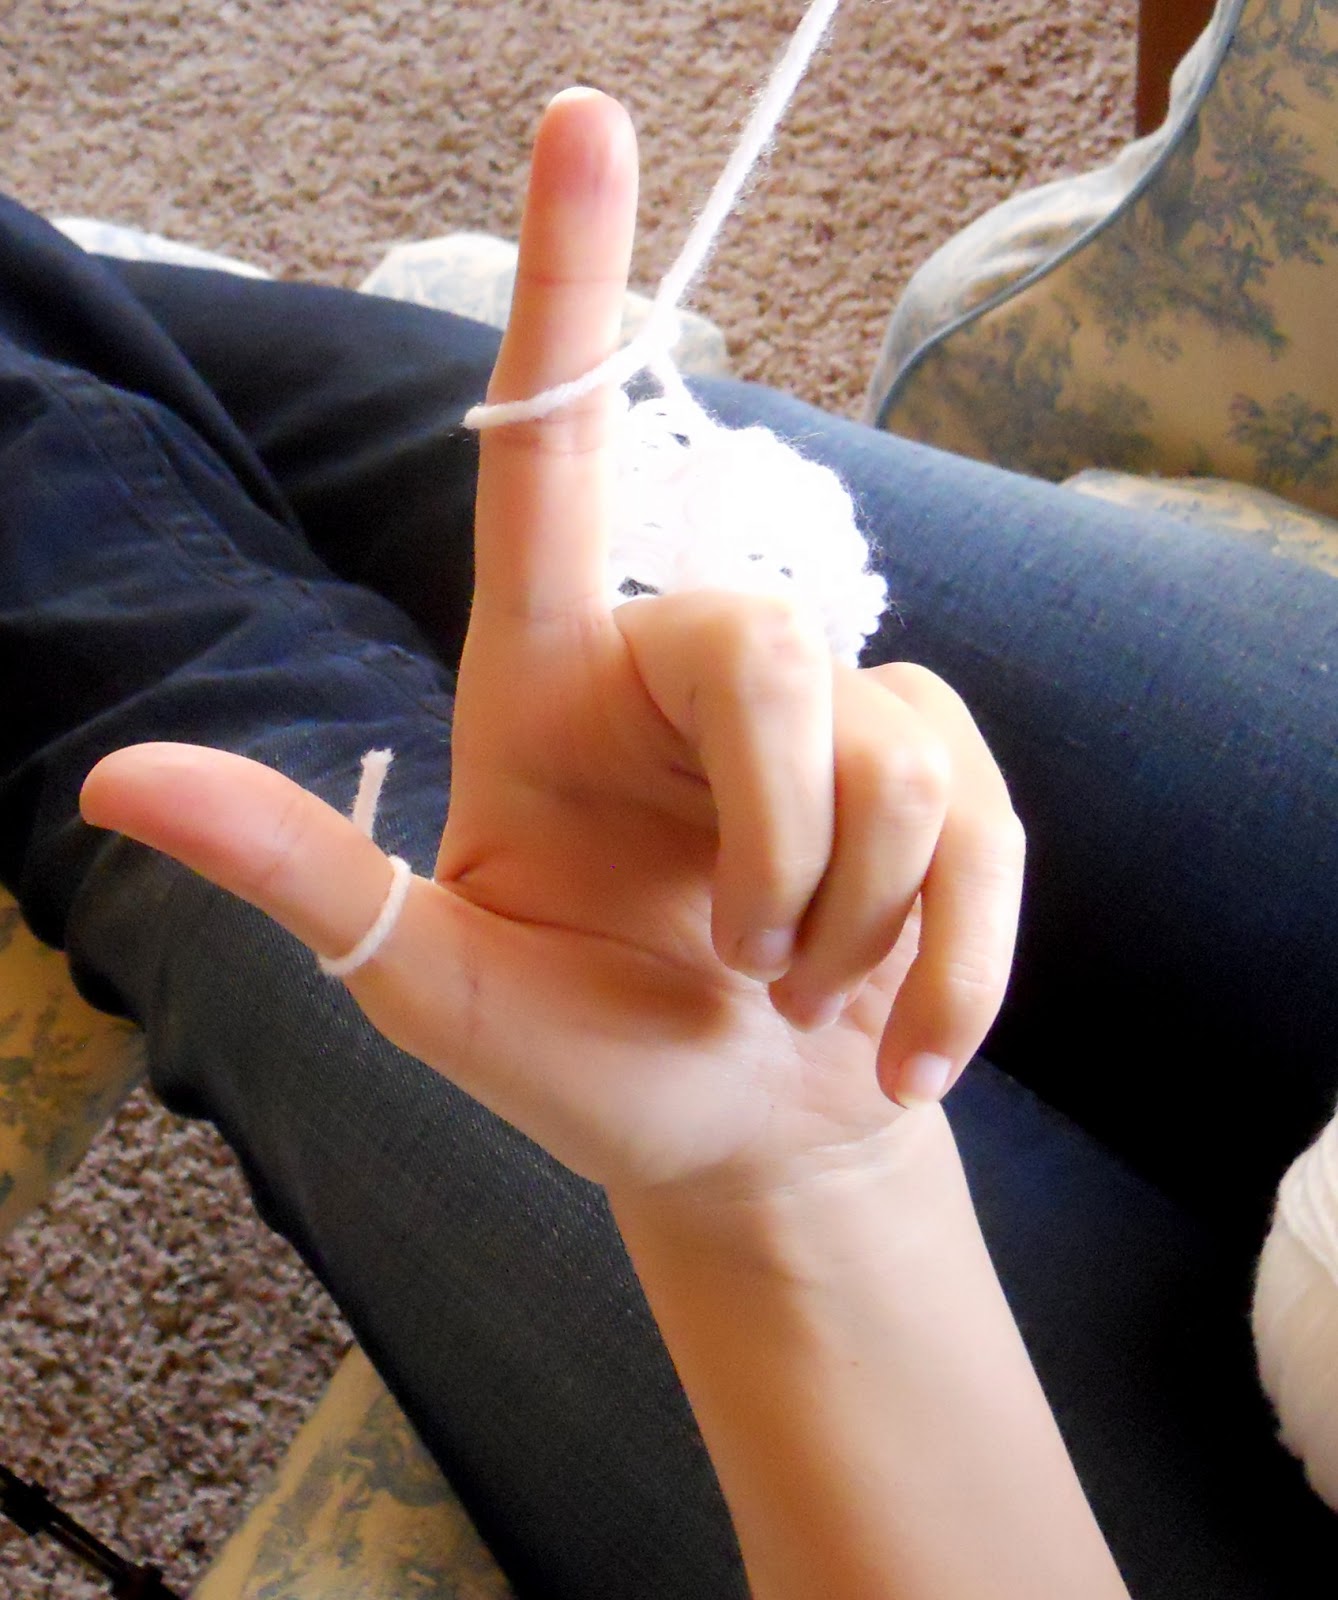
With the yarn secured to your thumb, weave the yarn behind your index finger, in front of your middle finger, behind you ring finger, and in front of your pinkie, just like this:


Then, just weave the yarn back.  Draw it around your pinkie finger, in front of your ring finger, behind your middle finger, and in front of your index finger.  It should look like this:


Now take that string behind your hand, like this (with handy arrows pointing the way):


And then bring the string back up to your thumb:


Alright, that’s the set up!  Now to start knitting.

Starting with the index finger, place the long strand above the strand on the index finger.  (The long strand is the one across your palm.)  Pull the bottom strand (the strand on the finger) away from the finger creating a hole.  Put your index finger through that hole and slip the yarn behind the finger. 

Sound confusing?  Here’s some pictures to help.  The first one shows the hole, with the long strand on top and the finger strand on the bottom:


The finger goes through that hole and the yarn you are pulling goes behind the finger.


Making more sense now?  Repeat this move for each finger:


And that’s it!  If it doesn’t make sense, just try it a few times following closely to the pictures and you’ll get it. 

To keep going all you do is wrap the yarn around your hand again from back to front:


And repeat the process.  Do this over and over as long as you like (it can actually get to be a soothing process from the repetitiveness of it) and pretty soon you will have a funky looking chain of yarn on your hand.


Finishing this off is simple.  When you have a length that you like, just cut the yarn leaving at least 5 inches. 


Just slip that yarn end through each finger loop, pulling it off the finger as you go.


When you take it off it will look like this:


But to turn it into that skinny chain, just pull on both ends and voila!


And that’s it!  Easy right?  And now you have a cool and funky yarn chain!


This tutorial was just to show the finger knitting basics.  Tune in tomorrow to see how I used this process to make a more stylish, adult version!

Thursday, February 14, 2013

Martha Makes: Valentine Goodies


The February issue of Martha Stewart Magazine had a bunch of great recipes.  After weeding out the ones that used never-heard-of-you ingredients and the kitchen equipment made out of spun gold, I settled on two recipes that are super delicious and surprisingly simple!

First up: a yummy breakfast sandwich using frozen puff pastry.  All you do is roll out the puff pastry and cut it into squares, put some bacon on top, bake it in the oven, and top it with a fried egg.  Easy!  You can get the recipe on Martha’s website

I made this for breakfast on Valentine’s Day, so I decided to be cutesy and cut the pastry out as hearts.


The yellow goop is egg wash.


The flaky pastry made it taste like an egg Toaster Strudel, yum!  This was pretty easy to make, but not really for quick mornings since you need to thaw and roll out the pastry, then let it refreeze for 30 minutes.  I rolled it out the night before and stuck it back in the freezer.


Simple and yummy!  Perfect Martha!

Next up, I made a super yummy, super moist, super gooey coconut sheet cake!


You can also get this recipe on Martha's website.  This month there were like 5 chocolate cake recipes that all looked delicious, but this was the easiest to make so it won. 


Evolution of a cake.

This kind of tasted like a coffee-flavored German Chocolate Cake.  There is coffee in both the cake and the coconut topping, so the coffee flavor is pretty strong (although it mellowed out and the cake tasted even better the second day). 

This cake is veeerrrrry rich!  A small piece is all you need.  I will definitely be making this one again!


Topped with whipped cream and toasted coconut, perfect!  Two for two this month Martha!

Hope you try these out!  And have a lovely Valentine’s Day!

Thanks for reading!

Monday, February 11, 2013

Valentine Art: Raised Embroidery


I know Valentine’s Day is almost here, but it’s not too late for some pink and red craftiness! 

Usually my decorations for Valentine’s Day consist of putting out old Vday cards as a subtle reminder to my husband that it is time to get me another Vday card and with it, chocolate (the real goal).  This year I wanted to make an actual decoration, but I wanted to keep it simple.  Behold, cute and simple Valentine art:


I made these by gluing a rope to a canvas and stitching around it.  (Inspired by a pin I’ve seen floating around on Pinterest that links to a little more complicated stitch.  You can check that out here.) 


For the heart I decided to be trendy and made it ombre in shades of pink.


Clean, simple, and a nice way to perk up the mantle.


Want to make your own?  It really is easy to make, but it is a little time consuming.  But don’t let that stop you!  I had myself a mini Jane Austen movie marathon while making these; Emma, Pride and Prejudice, and Clueless!  

So, let’s get started!  Here’s what you need:

Art Canvas:  For the ‘Be Mine’ I used a 9”x12” canvas and a 10”x10” for the heart.  I got both of these at Michaels.  Just make sure that the back of the canvas is open enough for you to get your design at the size you like.

Rope Cord:  I got my rope cord at JoAnns.  I used 1 ½ yards of rope total for both pieces, but buy extra in case you need it.

Embroidery Floss:  For the ‘Be Mine’ sign I used 4 skeins of floss, for the heart I used four different shades of pink and used less than 1 skein of each color.

Other:  Glue gun; sharp, sturdy embroidery needles; lamp, paper, and pencil.

First step, designing your sign.  Measure the back of the canvas to determine how big your design can be.


Cut out a piece of paper the right size to use as a template, and make your design.  I wanted the ‘Be Mine’ to be somewhat cursive.  Draw out your design and make sure you like how it looks and that it fits.


To trace the design to the front I just taped the paper to the back of the canvas, propped it up against a lamp, and traced the design in pencil.


Now it’s time to start cutting the rope.  Just match up your rope to your design and cut the pieces to the sizes you need.  I recommend cutting all the pieces first, so as you are gluing you don’t have to stop to cut.


Once your pieces are cut, fire up that glue gun and start gluing the rope down.  Go one letter at a time and quickly lay the rope pieces down on the glue.


Repeat the process for the heart and let the glue dry.  Now it’s time for embroidery!


I used all six strands of embroidery floss to make sure that the color was full and there were no white spots showing through.  Keep your stitches close together and close to the rope for a nice tight look. 


Here is a close up of how I worked the cross over on the letter ‘e’.


Just keep stitching away until you’re done.  The ‘Be Mine’ sign took more time to do because of all the curves, but I also got much faster as I went on.  The heart was much quicker to do.  Before starting mark off on the heart where you want the color changes.


And you’re done!  Now you just have to find the perfect spot to put your awesome artwork. 

By the way, did you notice that ugly stain on the heart canvas?


The stain was hidden under the label of the canvas, so I didn’t know until I opened it up!  Grr, I tried to get it off but neither bleach nor Oxy Clean worked.  I debated painting it white, but I found another solution:


Cue the strategically placed candle, and all is well.


I really like how these turned out.  If I look at it too hard, the ‘Be Mine’ sign kind of looks like it says ‘Be Mire’, but I can live with that.  I may have to make some art like this for every holiday!


This could also be done on regular embroidery fabric, which would be easier to stitch through than the canvas.  But I like how the canvas gives it more of an art look, plus it is sturdier for this heavy embroidery.  A light fabric might sag or pull funny from the weight.

I hope this inspires you to try out this technique in your own awesome artiness!

Thanks for reading!


Wednesday, February 6, 2013

Superbowl Sandwiches


Bacon and cheese and ham, oh my! 


This recipe comes from my husband’s family.  Making these sandwiches are a Superbowl tradition for them and now for us.  They are greasy and cheesy and fatty and oh so good!  So even though the Superbowl is over for another year, these sandwiches can invoke that pig-out spirit all year long!

These simple sandwiches are broiled in the oven.  Here’s what you need to make 1 sandwich:

1 slice Sourdough bread
Onion slices to taste
3 slices of Ham
2 slices of Cheese
2 strips of cooked Bacon
Mustard and Mayo to taste


Cook the bacon and turn on the oven broiler.  Toast the Sourdough and spread on it the mustard and mayo.  Then layer on the other ingredients in this order: onion slices first, then ham, cheese, and top with the bacon.  Place on a baking sheet.


Pop that bad boy in the broiler.  Our oven is gas so the broiler is at the bottom of the stove. 


Ignore what looks like bird doops, we are renting, so who knows what that is.

Anyway, broil the sandwiches for about 5 minutes, or until the cheese is melted and gooey.  Then dig in to that deliciousness!


Like I said, the ingredients I wrote out are what you need for 1 sandwich, so obviously increase to make as many as you need. 

These go great with chips, salsa, guacamole, spinach artichoke dip, nachos, cocktail weenies, bean dip…

Mmm, already waiting for the next Superbowl!


Hope you try these!  Thanks for reading! 

Sunday, February 3, 2013

Armchair Reupholster


This is my first major furniture reupholster and it has been a long time in the making.  About three years ago back in wonderful South Pasadena (California) I was driving down the street with my husband and visiting brother and sister-in-law when we saw this beauty on the street corner (ooh-la-la) with a ‘for free’ sign on her seat.


I instantly fell in love and had to have her.  We came back from breakfast and she was still there, so we loaded her up somehow in the trunk of our little car and took her to her new home.

Where she sat in our garage for two years.  Then we moved her to her new home in ABQ.  Where she sat in the garage for another few months, suffering all sorts of injustices, such as being run into by the husband and breaking the arm.  After that incident I knew it was finally time to bring this beauty back to glory. 

I started way back in November, but I finally finished! Here she is boys:


Beautiful!  Wonderful!  I love how it turned out, and for my first time reupholstering, with surprisingly few mistakes.  Here’s a side by side so you can see the transformation:


Here is a blurry close up of the pattern, it is called rustic living.


I also painted the feet of the chair a bright blue for a nice pop of color.

It is the comfiest chair too!  Perfect to kick back and knit in.  Oh, how it has made me miss South Pas.  People there put out perfectly good free furniture out in the alleys all the time!  I have at least 5 other pieces of furniture I’ve saved and remade for my house that I found abandoned in alleys.  Folks in ABQ don’t seem to do that, or maybe I just don’t drive around enough.

But anyway, back to the chair.  I’m not going to give a step-by-step tutorial on furniture reupholster, because there are lots of tutorials already out there.  I will just share my tips and suggestions that I learned along the way.


Poor broken arm after the hit and run.

Tip #1: Take pictures of every single step!!!  This is the most important tip!  When you reupholster a chair, basically you are taking off the pieces of fabric, using those as templates to cut out new fabric, and then putting the new fabric back on in the same way.  If you don’t take pictures, you will quickly become confused on how to put it all back together.  Especially if you’re like me and you take three months from start to finish. 

Tip #2:  If you come across something unusual, write it out or take a video.  This goes along with tip #1, but this is for when you are pulling off fabric and all of a sudden you are confronted with a funky metal thing with sharp teeth, and you are thinking, “how the heck did this get on there?”  Slow down, and take notes on how that part fit together.  Because, trust me, you will not remember when it’s time to put it all back together.

Check out this video on You Tube to see how the metal teeth go back on the back frame of a chair.  This really helped me out.  It also made me really wish I had an power staple gun like the dude in the video.

Tip #3:  Take the whole chair apart.  If you are able to, unscrew everything and take the whole chair apart, like so:


I didn’t figure this out until after I had pulled all the old fabric off.  Would have made it much easier, and it would have been near impossible to get the new fabric on if I didn’t take it apart.  This also made it easier to fix that broken arm.

Tip #4:  Have a helper, preferably a big strong sexy man (or woman).  This is definitely a two person job.  When you are stapling the fabric back on it needs to be pulled taut so that the fabric lays nice and flat.  My husband helped me put the whole thing together, and it would not have looked so nice without his help.

Tip #5:  Have all the right supplies on hand.  Buy more fabric than you think you need, especially if you're a fool like me and you chose fabric with a specific pattern than could only go one way.  Have a staple gun and plenty of staples.  I reused all the cotton batting in my chair since it was still in good shape, but if yours is gross than have plenty of that on hand.  Most chairs will require some sewing as well to get the right shape.

Tip #6:  Patience!  Pulling out staples, putting in staples, messing up and starting over, cutting your fabric in the wrong orientation, running out of fabric and making an emergency trip to the fabric store praying the whole way they still have the same fabric in stock.  Yeah, fun stuff.  This isn’t an easy project, so if you’re wanting to take on a reupholster job, brace yourself for frustration.  Just take it slow, relax, and soon you’ll have an awesome new chair.


I think that’s all my tips.  This was a cool project to do, but it was a lot of work.  Hopefully some of these tips will help you out if you tackle a reupholster job!


And now it’s time to go relax and do some knitting in my awesome new chair!  Thanks for reading!