Wednesday, October 31, 2012

Old Dresser Redo


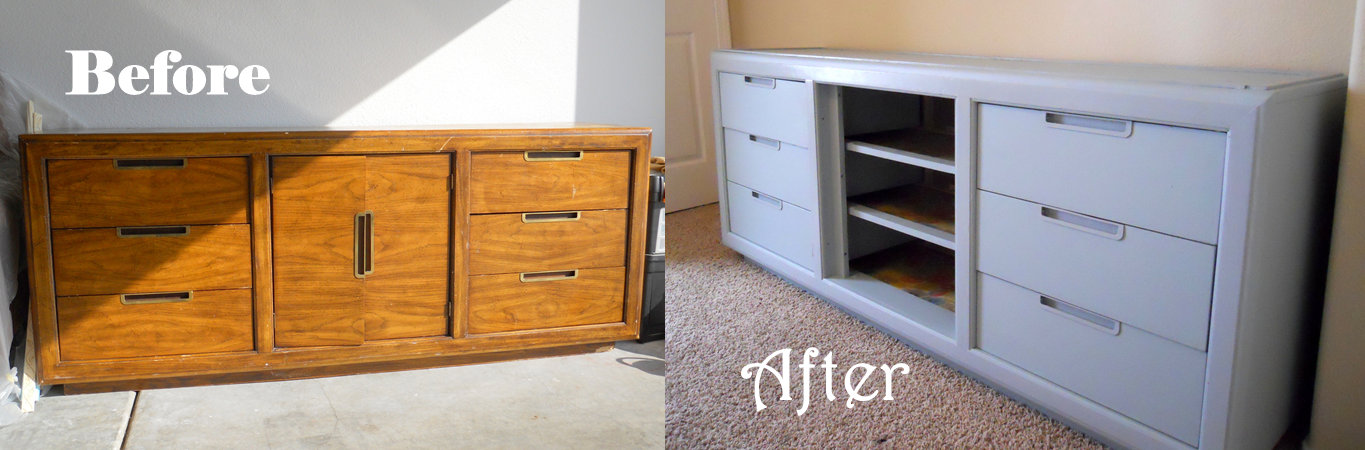
In my apartment in California I had a big, deep hallway closet full of shelves.  This was my craft closet and it fit everything perfectly.  But this new house only has one closet with shelves in it, and it is tiny.  Definitely not enough space for a fabric hoarder.  It’s enough for all my containers of loose supplies, but no room for my piles of fabric.   So I needed something more functional and cuter to store my fabrics in than boxes on the floor.  Cue the trip to the thrift store!
I found this beauty at Savers for only $30, but my $20 off coupon brought it down to $10, score!  It weighs a million pounds and had sticky drawers, but I loved how big and deep the drawers were, perfect for all my fabric! 

This post isn’t going to be a tutorial necessarily, since I am by no means an expert on furniture restoration.  This is more just to show what I did, and some of my tips and advice on what I learned from my inevitable mistakes. 

 
First I took out all the drawers and unscrewed all the brass handles on them.  The dresser had 9 drawers, but I decided to leave out the middle three drawer and the doors to make it like an open shelf.  I took off all the hardware for those drawers, but kept them because you never know when you’ll need a drawer slider.  (I will never need a drawer slider, yet keep it I shall.) 

Make sure to keep all your nuts and bolts and whatnots together, it is a pain in the neck to lose a screw that fits perfectly and have to hunt all over for another one the same size.

After cleaning out the drawers I lined them with some fun wrapping paper that I got at Party City.  I measured and cut it out to fit in the drawers, then Mod Podged it on.  As you can see, I didn’t quite measure right.

 
Yeah, big ugly gaps and creases in the paper, and a lazy me that didn’t feel like recutting and regluing it on.  So that drawer was designated to the be the seldom used junk drawer of the dresser.  Pretty soon I got the hang of it though and the rest of the drawers turned out pretty good.


Once they all had the paper in place I got them all nice and painted up.


When I painted them I thought that I would just paint along the top of the paper at the edge with my nice steady hand.  Except that I don’t have a nice steady hand and instead got paint everywhere and a sorry excuse for a straight line.  So, to hide my mess I glued some ribbon to the top of the drawers and also down the edges to hide some spots where there paper didn’t meet nicely.  It turned out rather lovely.


Now onto the main body of the dresser.  I didn't sand off the old finish, and I know that this will cause my paint to easily scratch off in the future, but that's not a bother to me.  I got the same color paint (Martha Stewart paint called Winter’s Day) in both matte and glossy.  I used the matte paint for the main body and used the glossy paint for accents.  The glossy paint gives it a subtle contrast, rather than the glaring one I was originally thinking of (I almost went with a metallic paint for the accents, glad I didn’t).  To add some dimension and visual delight to the dresser I glued on some molding to the top.  I got this vine molding at Michaels.


I used Gorilla Glue to glue it down, and once again I didn’t read the directions before using this glue.  It expands while it sets, so you only need to use a tiny bit.  Yeah, I used a bunch and the glue oozed out everywhere.  I sanded off the excess glue, but it was a pain.  Next time I will remember!

I painted the molding in the glossy paint, here’s an upclose to see the detail, I love how it turned out.

 
I also used the glossy paint to paint around the front edges of the dresser.  Remember how I said I was making three drawer spaces open shelves?  To make them even prettier I glued down some cute scrapbook paper.  And by this time I had run out of Mod Podge and was too lazy to go to the store, so I watered down some Elmer’s glue and it worked just fine.


And while I was taking the above pic, I went ahead and knocked over my whole can of glossy paint that I had left sitting open by my feet.  Good job me! 


But, it didn’t go to waste!  I used the puddle to paint the brass drawer handles.


Waste not want not, right.  After 2 coats of glossy paint on the edges and the drawer handles screwed back on, I was done! 


We hauled that heavy beast upstairs where I added some finishing touches.


I spray painted some wicker baskets to hold my yarn.  The basket on top holds the supplies for my upcoming projects.  When I can easily see what projects I have to do I get more excited to do them.  That helps to combate my procrastination tendencies.

 
And of course, drawers full of beautiful fabric!


And finished!  It turned out great, especially for my first furniture redo.

Now, what did I learn and what would I do differently next time?  I would take the time to make a checklist and be sure that I had all my supplies ahead of time, like more Mod Podge, tarps to lay down, painters tape, the little things you don’t think of until you need.  I would make sure that the dresser was structurally sound before painting it.  I knew the drawers were sticky but I thought it wasn’t a big deal so I didn’t sand them down.  After a couple coats of paint they are thicker and stick even more now.  Eventually I’ll go back and sand them down, but that seems like too much work now!  I also would have painted the inside of the drawers before adding my paper so that the gaps wouldn’t be as noticeable.

This little area is now my favorite spot in the house!  Thanks for reading!

Monday, October 29, 2012

Opening the Window


Wow, first post here on Corner Window Crafts.  Starting a blog is something I have wanted to do for a long time, so I am excited to have finally reached this goal!  Good job me! 

I read lots of craft blogs and I scour Pinterest often for new ideas.  But I realized that I had some good ideas of my own that I never saw on those blogs or Pinterest.  I decided that I wanted to start creating some content, rather than just consuming it.  And so the Corner Window blog was started!

I also wanted to start this blog as a way to give structure and purpose to my days.  I graduated from college in June but have yet to find a job.  I could just suck it up and get a cashier job, and I just may, but for now I’m still looking out for something better.  In the meantime, this will give me something to do!  Hooray!

Hopefully people with find this blog helpful and inspiring with their own crafty endeavors.  But even if no one ever reads it besides my husband, at least it will still be there pushing me to create more and do more with my days. 

Thanks for stopping by, and welcome to the world Corner Window!