Friday, November 16, 2012

Exploring New Mexico: Bosque del Apache Wildlife Refuge


Last weekend my parents were in town visiting us and we took them down to the Bosque del Apache Wildlife Refuge.  This is a beautiful and stunning preserve along the Rio Grande.  It’s about two hours south of Albuquerque near the town of Soccorro.  If you live in NM and haven’t been here yet, you are missing out!

The Refuge hosts thousands of migratory birds headed south for the winter.  Some of them stay here all winter, some of them keep going to Mexico.  A lot of volunteer work goes into keeping the Refuge going, check out the website for the Friends of the Bosque to learn more and to see some amazing pictures.

My pictures don’t do the beauty of this place justice.  The way the sun hit the golden leaves and just lit them up was amazing!  Birds flying in from all directions, I wish I had a better camera to get some up close shots of the bigger birds.  But, I think some of my pictures turned out pretty good.  For your pleasure:


Deer!  We saw I think three different groups of them.


Enjoying the view with my parents.


I love how this shot turned out!  It almost looks like I photo shopped color and black and white together.  The sun was hitting the trees just perfectly!


Thousands of snow geese.  I asked my husband to run through them so I could get a shot of them flying, but he wasn't game.

 
Sunset to end a lovely day.

New Mexico really is the land of enchantment, treasures like the Bosque seem to be all over the place!

Wednesday, November 14, 2012

Pillowcase w/Flap Tutorial

It drives me nuts when my pillowcase wiggles its way down the pillow during the night.  Recently in a fight of annoyance over just such an occurrence, I gave my pillowcase a good shake to get it back in its proper place and…


…ripped the edge right off the pillowcase. 

Whoops.

I thought to myself, there must be some way to keep pillowcases on the pillows!  And then I came up with a brilliant idea to sew a flap on the edge of the pillowcase to tuck the pillow into.  Then I noticed that the spare pillowcase I had been using to replace my torn one had just such a flap.  Then I realized that my brilliant idea was really just a memory of something I’d seen before.

I may not have revolutionized the pillowcase industry, but I did decide to get some cute fabric and make my own pillowcases with said flap.  Making a pillowcase is pretty straightforward, and I am sure that there are many a tutorial out there showing how to make one, but I’ll still add my voice to the count and show my process.

I made two: one is simple, just fabric.  The other I embellished a bit with some lace and scrap fabric.

 
My measurements are for a standard pillow size of 20”x30”.   You need 1 ½ to 2 yards of fabric, depending on if your fabric has a pattern you are trying to keep in one direction. 

Cut out two rectangles:  One that is 30 ½” x 20”

                                    One that is 39 ½” x 20”


Now you could be like me and just start cutting without first making sure that you can get both rectangles in one piece out of your fabric.  I don’t recommend this.  Instead, you could be smart and measure first and get two complete rectangles. 
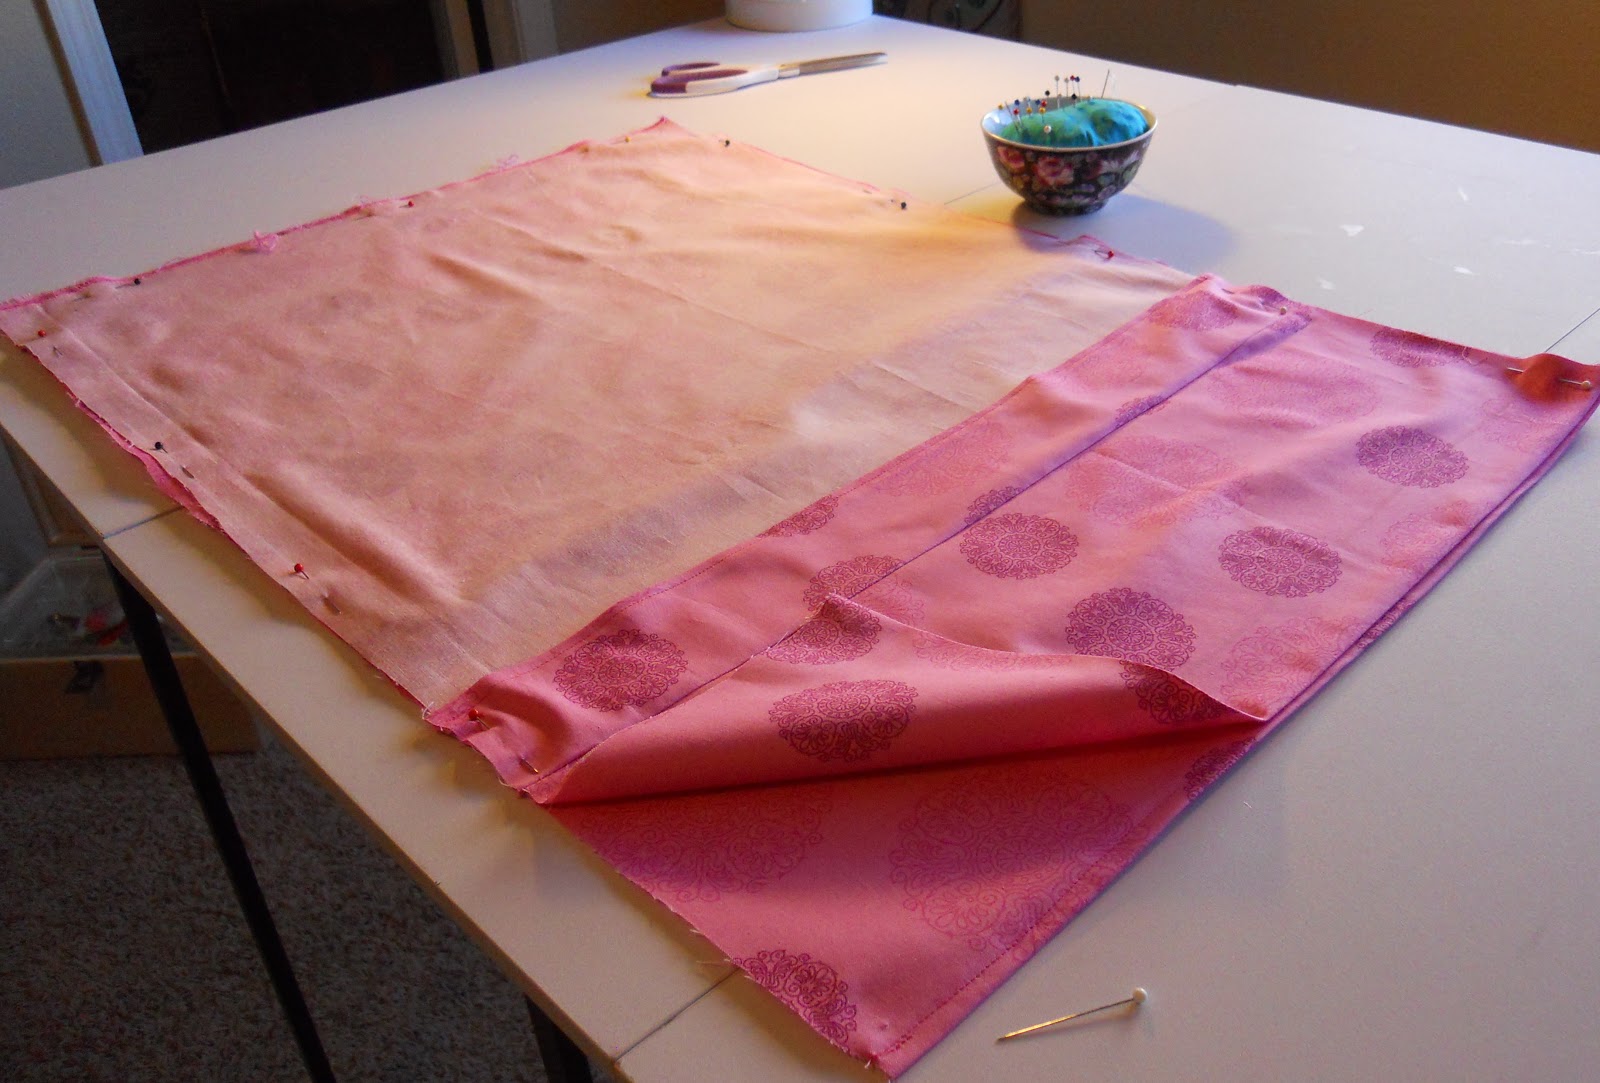
You can see in the picture above and the close up below, I cut my shorter piece before realizing that I needed to have my fabric the other way to get the long piece.   To remedy this I just sewed on another piece of fabric to get the length I needed.
 

And fixed!  Since this part will be the flap on the inside of the pillowcase it isn’t even noticeable.

Next, you sew down one short edge on both of your rectangles.  I folded the fabric under ¼” and ¼” again, then pressed with the iron and sewed it in place.

Then you take the longer rectangle and measure down 9”.  Fold the fabric here and press it down.  This is the flap.


From here on out it’s pretty simple.  Just pine the two pieces together with right sides facing:

 
Sew all around and trim off the excess:
 

Turn the pillow inside out.  You could end here, but I did one more step to sew down the raw edges at the top of the pillow right here:

 
Just press it to one side and throw a little zig-zag on that bad boy.


And done!  No wiggly pillow is getting out of this fortress!


For the second pillow, all the steps are the same except where I added some embellishment.  At first I was only planning on adding the lace strip, but then I once again cut the fabric without first measuring it all out!  Grr, I annoy myself sometimes! 

Anyway, this was a happy mistake, because I had to get creative to get the right length of fabric, and I luckily had some scraps in my stash that matched my fabric.  I think the end product turned out cuter than if I had originally planned.

 
To add the lace strip, I just cut off the last 4” of my short rectangle and pressed all the long edges down ¼” and ¼” again.  Then I sewed the lace to the underside of the longer piece:

 
And sewed it to the top of the shorter piece:


I like the way the decorative edge of the lace gives a small frill to the pillow.


Then just follow the rest of the steps for putting it together and you’re done!

 
No more pillows getting loose in the middle of the night!  Hooray!

 
Now go make some pillows and have sweet dreams!


Monday, November 12, 2012

Pinterest Day: Pumpkin Roll Up

As the seasons headed into fall, I found myself pinning a lot of pumpkin recipes.  Pumpkin flavored everything is one of the best things about fall!  For this Pinterest post I decided to try out two pumpkin recipes: a pumpkin roll from My Baking Addiction blog and a pumpkin bundt cake from Never Enough Thyme. 

Both recipes turned out awesome; so awesome in fact that we ate the bundt cake before I even got a picture of it!  Guess since I’m still new to blogging I haven’t yet gotten into the habit of photographing everything ;).

So, even though I don’t have a pic of my bundt cake, it turned out super yummy, very moist and light.  I definitely recommend trying it out.

The pumpkin roll I did take pictures of, because the process of making a roll is more involved than making a bundt cake.  This one also turned out really yummy, but mine wasn’t quite as pretty as the gal’s I got the recipe from.   Here’s mine:


You can get the recipe here, but I am going to show the steps so you can see how the process looks. 

I will also take a moment here to admit that I am something of a pumpkin purist.  Growing up, my mom always mashed up our Halloween pumpkins and turned them into glorious Thanksgiving pies.  I have always been able to taste the difference between a dessert that uses fresh pumpkin and canned pumpkin, and I always prefer the fresh.  So, every year I cook and mash up my Halloween pumpkins and turn it into my own glorious pies and breads and cookies. 

If you’ve never cooked with fresh pumpkin, I recommend it!  Try it and see what a great difference it makes!  Ok, done with my pumpkin preaching.  For your pleasure, here is a pic of my pumpkin mash, ready to be divvied up and frozen:


The pumpkin roll batter can be a little liquidy.  (It’s basically like pumpkin bread.)  After mixing all the ingredients you spread it evenly in a parchment lined jelly roll sheet.  I also sprayed the sheet underneath the parchment in case any batter seeped through it wouldn’t bake on.


After cooking you turn it out onto a floured dish cloth:


And roll it up:


Easy as that.  You let it completely cool before unrolling it.  Here’s where I had some trouble.  When I’ve made rolls before, I’ve rolled them up in parchment or wax paper, but the directions for this roll used a towel so I thought I’d try that out.  I didn’t have much luck:


 Yep, that’s a nice layer of my roll left behind on the towel.  Maybe I didn’t flour it enough, or maybe I should have sprayed it with oil as well.  If you try this yourself, make sure to really flour it up.  I think if I do this again I may just use the parchment paper like I’ve done before; I always get fine results with that.

When I unrolled it I got a hole or two, but I just kind of mushed it together and it held fine.  Then you just slather on that yummy cream cheese filling and roll it back up.  Refrigerate for a while and it’s ready to eat!


Mine doesn’t have a nice glossy top since it left it on the towel, but really, who cares how pretty it is when it tastes so yummy!

 
Hope you try it out yourself!

Wednesday, November 7, 2012

Domino Tray

Today’s craft is fun with Dominos! 
 
 I love using dominos as a craft medium because they come ready to go with their own unique graphic design.  Dominos can be glued to just about anything, so they lend themselves to versatile and easy crafts. 

For example, you can glue them to a plain box to create an awesome box!  You can glue them to a boring square vase to create an awesome vase!  You can glue them to a square coaster to create an awesome coaster!  Do you see the trend here?  Endless options with dominos!

I used dominos to turn a beat up old thrift store tray into an awesome domino tray!  I found this tray at Goodwill for only a couple bucks.
 
 
At first I picked it up thinking that maybe I could somehow restore it.  I loved the inlaid wood design of South America.  (My mom grew up in South America, so I thought I could fix it up and give it to her as a gift).  I quickly realized however that I have no inlaid-wood-design-fixer-upper skills.  The wood was too scuffed and scratched up to fix up with some polish as I had planned.  So then I had to decide on something else to do with the tray.  Solution?  Dominos!


I got these dominos at Target.  I got the colored ones that go up to 12 for more variety.
The tray had some big cracks in it so first I fixed it up with my old friend Gorilla Glue.


After sanding down some rough spots I painted the whole tray black.  I think the dominos really pop against a black background.  When the paint was dry I started experimenting with different ways to arrange the dominos in the tray.

 If you make anything with dominos, make sure to lay out your design first instead of just gluing down willey-nilley.  You may find your pattern won’t work and you’ll have to pry off all the glued on pieces.  For my tray, any pattern I tried resulted with the same small square spot that wouldn’t fit a whole domino piece, but more on that later.
 
Also, it's a good idea to lay out your design first to make sure that you have enough dominos.  I had bought a regular set of dominos thinking that would be enough peices.  It wasn't at all, and I had to go back to the store to get the Mexican Train set since it had a lot more peices.

 Then I just glued my pieces down with Gorilla Glue.  And an unintentional Coca Cola plug, but now you know what my favorite drink is.


If you want you can scratch up the back of the domino so that it catches more on the glue, but if you’re using something as strong as Gorilla Glue I don’t think that step is necessary.  I didn’t do it and my dominos are all holding on strong. 

Make sure you don’t use too much glue!  Gorilla Glue expands as it dries, so if you use too much it will ooze up through the cracks in the dominos and leave ugly glue blobs that would be a pain to sand off.

By the way, this is the perfect craft to do while catching up on your favorite TV shows.  Once you have a pattern set, you just glue and stick.  Super easy, and soon enough you have this:


Awesome!  As you can see I have a little empty square up in the top right corner that I mentioned before.


Fortunately the empty spot was just the right size for half of a domino.  I used some glass cutters to snap a domino in half to fit there.  Yeah, not as easy as I was expecting it to be.  Which should have been obvious to me as a domino is much thicker than glass.  So I called on my hubby’s strong muscles to crack that baby in half for me.  That half I wanted to use (the pretty pink seven) lost a big chunk, but the other half made it through the ordeal intact!


I sanded it down to fit better and glued that bad boy in. 


And finished!  It turned out awesome! 


My tray has a small gap around the edge, but it doesn’t bother me so I left it as is.  It actually works great at catching pencils or knitting needles that roll around.  If you wanted to get really into it you could space all the dominos a bit and grout it.  But I don’t think that’s necessary if you’re using a strong enough glue.  And grouting is a pain.


Perfect tray to hold game night snacks, don’t you think?


Now go grab some dominos and make something awesome!

Friday, November 2, 2012

Martha Makes: DIY Instant Oatmeal


Today is the very first Martha Makes post.  Each month when I get my Martha Stewart Living magazine I eagerly read it and mark all the crafts and recipes I want to try.

And then I never do them. 

So, the purpose of the Martha Makes posts is to get me to finally start making some of these great crafts and trying some of those crazy recipes that are in Martha’s magazine.

 For my first stab at it I thought I’d go the simple route and try out her recipe for a simple DIY homemade instant oatmeal.  You can check out the recipe on Martha’s website. 

I followed her steps for toasting:


 Pulsing:


And finally adding brown sugar and salt.  She has some suggestions for add-ins, but I came up with some of my own that turned out super yummy.


First up, a yummy pumpkin spice combo perfect for chilly fall mornings.  I added roasted pepitas, pumpkin pie spices (1/8 tsp each of nutmeg, cloves, & allspice, but you can adjust this to taste), some cinnamon sugar, and dried cranberries.  Yum, I think this one is my favorite.


Next, a Hawaiian inspired mixture.  This one has toasted coconut (which I ate most of and had to toast more), chopped macadamia nuts, and dried blueberries.  I made this one with the husband in mind, as he loves those macadamia nuts.  You don’t have to toast the coconut, but it sure is good toasted!


And lastly, a mix inspired by Christmas morning.  This one has chopped walnuts, a mix of both dried cranberries and dried blueberries, and a dose of cinnamon sugar.  Mmm, I can see those Christmas lights already!

To serve all you do is dish out a half cup and add hot water until you get the consistency you like.  I also added a bit of milk for a little extra creaminess. 


So, how does this compare to store bought instant oatmeal?  To compare we cooked up a random packet that had been hanging out in our cupboards for months.  The texture wasn’t too different.  The homemade oatmeal was a bit chewier, which I liked.  It was also much heartier with all the extra add-ins we had.  Overall, I think the homemade oatmeal was a much better.

 
Some things to consider if you try this yourself:

I think I pulsed the oats one too many times.  I don’t have a food processer, so I used my powerful blender and I think it made some of the oats borderline flour consistency.  This is probably what made the final result seem thicker and chewier than the store bought stuff.  Next time I'll pulse it a bit less and see how that texture is.

I also put in less salt and more brown sugar than the recipe called for.  But this is to taste, I don’t like a lot of salt in my food, because then that’s all I taste, but oh how I love lots of sugar in my oatmeal!

 
Preparing this really took no time at all, and it is super-fast to whip up on an oops-I-slept-in kindof morning.  There is a lot of room for variety and experimentation with this recipe too, so I will definitely be making it again with some new combinations!

I hope you try it too!