Monday, February 11, 2013

Valentine Art: Raised Embroidery


I know Valentine’s Day is almost here, but it’s not too late for some pink and red craftiness! 

Usually my decorations for Valentine’s Day consist of putting out old Vday cards as a subtle reminder to my husband that it is time to get me another Vday card and with it, chocolate (the real goal).  This year I wanted to make an actual decoration, but I wanted to keep it simple.  Behold, cute and simple Valentine art:


I made these by gluing a rope to a canvas and stitching around it.  (Inspired by a pin I’ve seen floating around on Pinterest that links to a little more complicated stitch.  You can check that out here.) 


For the heart I decided to be trendy and made it ombre in shades of pink.


Clean, simple, and a nice way to perk up the mantle.


Want to make your own?  It really is easy to make, but it is a little time consuming.  But don’t let that stop you!  I had myself a mini Jane Austen movie marathon while making these; Emma, Pride and Prejudice, and Clueless!  

So, let’s get started!  Here’s what you need:

Art Canvas:  For the ‘Be Mine’ I used a 9”x12” canvas and a 10”x10” for the heart.  I got both of these at Michaels.  Just make sure that the back of the canvas is open enough for you to get your design at the size you like.

Rope Cord:  I got my rope cord at JoAnns.  I used 1 ½ yards of rope total for both pieces, but buy extra in case you need it.

Embroidery Floss:  For the ‘Be Mine’ sign I used 4 skeins of floss, for the heart I used four different shades of pink and used less than 1 skein of each color.

Other:  Glue gun; sharp, sturdy embroidery needles; lamp, paper, and pencil.

First step, designing your sign.  Measure the back of the canvas to determine how big your design can be.


Cut out a piece of paper the right size to use as a template, and make your design.  I wanted the ‘Be Mine’ to be somewhat cursive.  Draw out your design and make sure you like how it looks and that it fits.


To trace the design to the front I just taped the paper to the back of the canvas, propped it up against a lamp, and traced the design in pencil.


Now it’s time to start cutting the rope.  Just match up your rope to your design and cut the pieces to the sizes you need.  I recommend cutting all the pieces first, so as you are gluing you don’t have to stop to cut.


Once your pieces are cut, fire up that glue gun and start gluing the rope down.  Go one letter at a time and quickly lay the rope pieces down on the glue.


Repeat the process for the heart and let the glue dry.  Now it’s time for embroidery!


I used all six strands of embroidery floss to make sure that the color was full and there were no white spots showing through.  Keep your stitches close together and close to the rope for a nice tight look. 


Here is a close up of how I worked the cross over on the letter ‘e’.


Just keep stitching away until you’re done.  The ‘Be Mine’ sign took more time to do because of all the curves, but I also got much faster as I went on.  The heart was much quicker to do.  Before starting mark off on the heart where you want the color changes.


And you’re done!  Now you just have to find the perfect spot to put your awesome artwork. 

By the way, did you notice that ugly stain on the heart canvas?


The stain was hidden under the label of the canvas, so I didn’t know until I opened it up!  Grr, I tried to get it off but neither bleach nor Oxy Clean worked.  I debated painting it white, but I found another solution:


Cue the strategically placed candle, and all is well.


I really like how these turned out.  If I look at it too hard, the ‘Be Mine’ sign kind of looks like it says ‘Be Mire’, but I can live with that.  I may have to make some art like this for every holiday!


This could also be done on regular embroidery fabric, which would be easier to stitch through than the canvas.  But I like how the canvas gives it more of an art look, plus it is sturdier for this heavy embroidery.  A light fabric might sag or pull funny from the weight.

I hope this inspires you to try out this technique in your own awesome artiness!

Thanks for reading!


Wednesday, February 6, 2013

Superbowl Sandwiches


Bacon and cheese and ham, oh my! 


This recipe comes from my husband’s family.  Making these sandwiches are a Superbowl tradition for them and now for us.  They are greasy and cheesy and fatty and oh so good!  So even though the Superbowl is over for another year, these sandwiches can invoke that pig-out spirit all year long!

These simple sandwiches are broiled in the oven.  Here’s what you need to make 1 sandwich:

1 slice Sourdough bread
Onion slices to taste
3 slices of Ham
2 slices of Cheese
2 strips of cooked Bacon
Mustard and Mayo to taste


Cook the bacon and turn on the oven broiler.  Toast the Sourdough and spread on it the mustard and mayo.  Then layer on the other ingredients in this order: onion slices first, then ham, cheese, and top with the bacon.  Place on a baking sheet.


Pop that bad boy in the broiler.  Our oven is gas so the broiler is at the bottom of the stove. 


Ignore what looks like bird doops, we are renting, so who knows what that is.

Anyway, broil the sandwiches for about 5 minutes, or until the cheese is melted and gooey.  Then dig in to that deliciousness!


Like I said, the ingredients I wrote out are what you need for 1 sandwich, so obviously increase to make as many as you need. 

These go great with chips, salsa, guacamole, spinach artichoke dip, nachos, cocktail weenies, bean dip…

Mmm, already waiting for the next Superbowl!


Hope you try these!  Thanks for reading! 

Sunday, February 3, 2013

Armchair Reupholster


This is my first major furniture reupholster and it has been a long time in the making.  About three years ago back in wonderful South Pasadena (California) I was driving down the street with my husband and visiting brother and sister-in-law when we saw this beauty on the street corner (ooh-la-la) with a ‘for free’ sign on her seat.


I instantly fell in love and had to have her.  We came back from breakfast and she was still there, so we loaded her up somehow in the trunk of our little car and took her to her new home.

Where she sat in our garage for two years.  Then we moved her to her new home in ABQ.  Where she sat in the garage for another few months, suffering all sorts of injustices, such as being run into by the husband and breaking the arm.  After that incident I knew it was finally time to bring this beauty back to glory. 

I started way back in November, but I finally finished! Here she is boys:


Beautiful!  Wonderful!  I love how it turned out, and for my first time reupholstering, with surprisingly few mistakes.  Here’s a side by side so you can see the transformation:


Here is a blurry close up of the pattern, it is called rustic living.


I also painted the feet of the chair a bright blue for a nice pop of color.

It is the comfiest chair too!  Perfect to kick back and knit in.  Oh, how it has made me miss South Pas.  People there put out perfectly good free furniture out in the alleys all the time!  I have at least 5 other pieces of furniture I’ve saved and remade for my house that I found abandoned in alleys.  Folks in ABQ don’t seem to do that, or maybe I just don’t drive around enough.

But anyway, back to the chair.  I’m not going to give a step-by-step tutorial on furniture reupholster, because there are lots of tutorials already out there.  I will just share my tips and suggestions that I learned along the way.


Poor broken arm after the hit and run.

Tip #1: Take pictures of every single step!!!  This is the most important tip!  When you reupholster a chair, basically you are taking off the pieces of fabric, using those as templates to cut out new fabric, and then putting the new fabric back on in the same way.  If you don’t take pictures, you will quickly become confused on how to put it all back together.  Especially if you’re like me and you take three months from start to finish. 

Tip #2:  If you come across something unusual, write it out or take a video.  This goes along with tip #1, but this is for when you are pulling off fabric and all of a sudden you are confronted with a funky metal thing with sharp teeth, and you are thinking, “how the heck did this get on there?”  Slow down, and take notes on how that part fit together.  Because, trust me, you will not remember when it’s time to put it all back together.

Check out this video on You Tube to see how the metal teeth go back on the back frame of a chair.  This really helped me out.  It also made me really wish I had an power staple gun like the dude in the video.

Tip #3:  Take the whole chair apart.  If you are able to, unscrew everything and take the whole chair apart, like so:


I didn’t figure this out until after I had pulled all the old fabric off.  Would have made it much easier, and it would have been near impossible to get the new fabric on if I didn’t take it apart.  This also made it easier to fix that broken arm.

Tip #4:  Have a helper, preferably a big strong sexy man (or woman).  This is definitely a two person job.  When you are stapling the fabric back on it needs to be pulled taut so that the fabric lays nice and flat.  My husband helped me put the whole thing together, and it would not have looked so nice without his help.

Tip #5:  Have all the right supplies on hand.  Buy more fabric than you think you need, especially if you're a fool like me and you chose fabric with a specific pattern than could only go one way.  Have a staple gun and plenty of staples.  I reused all the cotton batting in my chair since it was still in good shape, but if yours is gross than have plenty of that on hand.  Most chairs will require some sewing as well to get the right shape.

Tip #6:  Patience!  Pulling out staples, putting in staples, messing up and starting over, cutting your fabric in the wrong orientation, running out of fabric and making an emergency trip to the fabric store praying the whole way they still have the same fabric in stock.  Yeah, fun stuff.  This isn’t an easy project, so if you’re wanting to take on a reupholster job, brace yourself for frustration.  Just take it slow, relax, and soon you’ll have an awesome new chair.


I think that’s all my tips.  This was a cool project to do, but it was a lot of work.  Hopefully some of these tips will help you out if you tackle a reupholster job!


And now it’s time to go relax and do some knitting in my awesome new chair!  Thanks for reading!

Monday, January 28, 2013

Pinterest Day: Egg Casserole in a Crock Pot


I am finally back to the world of the living after 2 weeks with the worst cold/cough/horribleness.  I did not move far from my couch during that time, and now it seems like the end of January came out of nowhere!  I am ready to get back into the swing of things!

I saw a recipe via Pinterest for an egg casserole made in a crock pot.  I love any kind of egg casserole, but I never thought of making one in a crock pot before.  It is pure genius; you put it together the night before and wake up to a hot breakfast ready to go! 

You can go to this blog for the recipe I based mine off of.  I tweaked mine a bit; halved the recipe to fit in my smaller crock pot and added some diced green chilies for some New Mexican flair.  It turned out delicious!   I will definitely be making this again.

Here’s the recipe:

½ Onion, diced
½ Green Bell Pepper, diced
1 Garlic Clove, minced
1 Tbsp Diced Green Chilies 
5 slices of Bacon
1 lb bag of frozen Hash Browns
¾ C. Shredded Cheddar Cheese
6 Eggs
Salt
Pepper
Smoked Paprika
Tabasco Sauce

First cook the bacon.  When it is cooled crumble it up.  While that’s cooking, chop up the onion, bell pepper, garlic, and green chilies and mix together.  (The original recipe said to then sauté the veggies, but c’mon, ain’t nobody got time for that!)

Spray the crock pot with cooking spray (even if you’re using a crock pot liner, it will stick to it).  Spread 1/3 of the hash browns on the bottom of the crock pot.  Top that with 1/3 of the veggie mixture, 1/3 of the bacon, and 1/3 C. of the shredded cheese.  Repeat these layers two more times, ending with cheese.

Whisk together the eggs and seasonings.  Add the salt, pepper, smoked paprika, and hot sauce to taste.  (If you haven’t used smoked paprika before, it is the best seasoning ever, I use it on everything.  Note that it is smoked paprika).  Pour the eggs over the other ingredients in the crock pot.

Cover and cook on low for 8-10 hours.


And then have sweet dreams of yumminess!

When you get up in the morning sprinkle on another 1/3 C. of cheese for a nice gooey-cheesy layer.  I also served mine with some salsa on the side.


This turned out really good, but it was a little on the dry side.  I think the next time I make this I will add some milk to the eggs to give it more moisture and fluffiness.  I also slept in and cooked it for the whole 10 hours, maybe at 8 hours it wouldn’t be as dry.

Anyway, this was a super easy and very yummy recipe that has a lot of room for variation!  If you have a bigger crock pot you can easily double it and feed a crowd! Hope you try it!

Thanks for reading!

Friday, January 18, 2013

DIY Lighted Peace Sign


Let me start off by saying, this lighted peace sign is one of the coolest things I’ve ever made!  I love how it turned out and it was really pretty simple to make!

First, let me share with you my inspiration.  A few months ago I was browsing around on Mod Cloths website when I saw this:


I instantly fell in love, but for $90, no thanks!  But, I did think that I could possibly make something like that.  Then the next day I was in Hobby Lobby and saw that they have unfinished wood peace signs.  And the light bulb turned on! 


I thought, all I have to do is drill some holes, stick some lights in, and I’ll have a groovy peace light all my own!  It took a little more work than just that, but I love my end result!


Want to make your own?  It does require a little bit of woodworking, so you’ll need to have a drill and sandpaper.  Don’t be intimidated by that though, this isn’t hard to make!

Okay, so here is what you need:

Two Wooden Peace Signs:  I got mine at Hobby Lobby.  They had two sizes, 20” diameter and 10” diameter.  I used the 10” for this.  (The Mod Cloth light is 20”). 

Balsa Wood:  Balsa wood is a lightweight, flexible wood commonly used for hobby crafts (model cars, planes, etc.).  I also got this at Hobby Lobby (you won’t find this at a place like Home Depot, if you don’t have a Hobby Lobby around try a hobby store).  The balsa wood I used is thin, about 1/4” thick and 1” wide.  I recommend getting at least 3 strips in case you snap one while bending.
I should also give my husband some credit here, I had never heard of balsa wood but he suggested it for this project, and it took it from meh to awesome!

LED Christmas Lights:  I recommend using battery operated lights so that you aren’t tied to an outlet.  I found that regular Christmas lights were too bulky and wouldn’t tape down well, but the mini-lights I used were very flexible and lightweight.  I got them at Target.  Whatever you use, make sure the lights are LED so they don’t overheat.


Wood Stain or Paint:  I stained my wood a color called Espresso.  Painting this a bright color for a kids room would also be cute.

Other:  Drill, Gorilla Glue, masking tape, clamps, wooden spacers (optional), and a groovy sense of craftiness!

Alright, let’s get started!  First thing to do is mark on one of the wood signs where you want to drill your holes.  I made 19 holes in mine.  Then clamp the sign down to a sturdy surface and start drilling the holes.


Sorry for the poor lighting in these pics, it was 20 degrees outside and I wasn’t about to open the garage door for more light.  Anyway, make sure you use a drill bit that makes a big enough hole for your lights to poke through.  I did not have a big enough drill bit, but I found that after drilling the hole I could push a screwdriver through the hole and get the perfect size.


Using the right drill bit size to begin with would obviously be easier, but this worked for me!  I also made a cut out on the bottom of the other peace sign for the light cord to go through.  I’ll show a picture of that later.

Next, sand down the rough edges and stain both the peace signs.  While those dry, you can get started on shaping the balsa wood.  Balsa wood is very flexible to begin with, but soaking it can get it to bend even further.  I soaked a strip of balsa in hot water for about 2 hours.  I just put it in my bathtub with some weight to hold it down.


Just check on it to make sure the water doesn’t leak out, because I found that once this is soaked and dried, it won’t become flexible again even after another soak.  So, after soaking for two hours the balsa should be flexible enough for you to bend it into a circle.  Do this very carefully, and if you hear the wood cracking put it back in the water for another half hour.  You should be able to get it bent around your peace sign with no cracking.


I bent the balsa around my peace sign and used a clamp to hold it in place.  Let this dry for at least 24 hours.  While that is drying you can get started on the balsa wood for the inside of the peace sign.  You could skip this step if it seems like too much work, but it really gives the finished sign a nice polished look, plus you don’t see any exposed lights.

Measure all the inside parts of the peace sign and cut the right sizes from the balsa wood (this is soft enough to cut with scissors).  For the curved parts I cut the wood to the right size and soaked it, then clamped it to a bowl to give it a soft curve.  Let that dry for 24 hours as well.

Once all that balsa wood is dry, it’s time to do some gluing!  Make sure to glue the balsa pieces to the back peace sign (the side without the holes).  I used Gorilla Glue, it is my trusted companion.  I recommend having a helper for this part, I tried to do this by myself and the wood kept springing away before I could get a book on it to hold it down.  But I managed!  Here is how it will look with all the pieces in place:


As you can see, my pieces aren't perfect, but once it's finished you don't even notice.  Once you have all the pieces glued weigh it down with your strongest book.


Strongest book, get it!?  I know, I’m funny.  You can see in the above picture the cut out I made for the light cord to go through.  Make sure you leave a space like this in the balsa for your light cord to come through!

Let that set for 24 hours as well.  Now it’s time to start placing the lights!  Try to lay the lights out in a way that stretches them so they don’t bulk up.  This makes it easier to tape down.  For example, I put a light in every other hole and went around twice, does that make sense?  Once you start doing it you’ll see what I mean.  Tape it all down with masking tape to hold it in place.  Make sure that the end of the light comes out the bottom.


You can see in that picture that I glued down some wooden spools as spacers, they weren’t necessary though.

When the glue on the other half has finished setting, stain the balsa wood to match.  Let that dry and then glue the whole thing together!  Just put a layer of glue on all the edges and carefully lay the two pieces together.  Lay that heavy book on top again and let the glue dry for 24 hours.  And then be amazed at your awesome craftiness!


All the lights are encased, so you don’t see any wires from the sides.  I did have some glue peep out, and my pieces aren’t perfectly aligned, but that’s part of the homemade-ness of it that I like!  Here’s the cord coming out the bottom:


And here it is in all its groovy glory on my mantel:


I love it!  It turned out better that I had imagined!  And I love the way the lights perk up the mantel.

I hope you try this out!  If you do send me pictures, I’d love to see other versions of this!  You could use this process with wooden letters, animal shapes, ooh the possibilities!  I love possibilities!

Thanks for reading!


Wednesday, January 16, 2013

Martha Makes: DIY Bath Sachets

This month’s issue of Martha Stewart Magazine was a little low on crafts and high on citrusy recipes (meat and citrus fruit should not go together in my opinion).  But I did spot this little nugget on the bottom of a page and thought it sounded interesting.  DIY bath sachets using eucalyptus plants and tea bags.  Sounded easy and I’d get a nice bath out of it, perfect!

I wanted more than just eucalyptus though, so I went to a local health food store and bought some dried lavender and dried rose petals.  I got the tea bags at Cost Plus World Market (random) but I couldn't find them at a grocery store. 


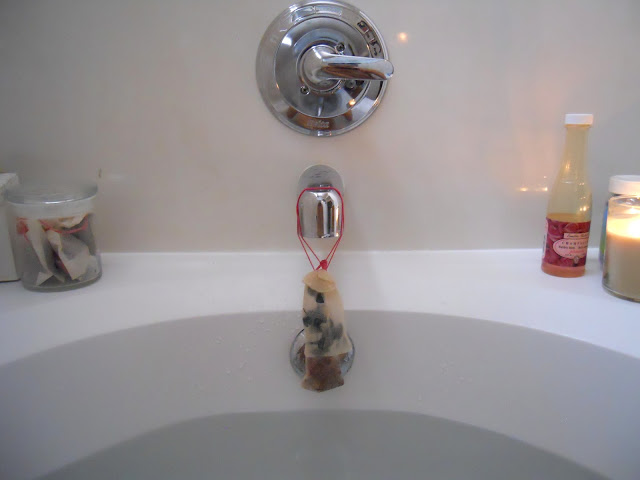
The process was simple; put the dried stuff in a tea bag and tie with a string.  I made a loop so I could hang it over the bath faucet.


Hang the sachet over the faucet and draw a nice hot bath.  And then be disappointed because instead of the rich, fragrant, bouquet-of-flowers bath you thought you’d have, it smells like water.  The sachets didn’t do anything!  I even hung up two, one with roses and one with eucalyptus. 


Maybe the water was infused with their herbal properties and I just didn’t notice, but overall I have to say this one was a bust Martha!

However, I did have a lovely bath on a cold snowy day, and now I can use the other sachets I made as potpourri, or throw them in my fabric dresser, so it all worked out in the end!  And I just got the February issue of Martha Stewart and it is chock full of great crafts and recipes!

Make sure you check back the end of the week, I have an awesome project to share!

Thanks for reading!