Whoops.
I thought to myself,
there must be some way to keep pillowcases on the pillows! And then I came up with a brilliant idea to
sew a flap on the edge of the pillowcase to tuck the pillow into. Then I noticed that the spare pillowcase I
had been using to replace my torn one had just such a flap. Then I realized that my brilliant idea was
really just a memory of something I’d seen before.
I may not have
revolutionized the pillowcase industry, but I did decide to get some cute
fabric and make my own pillowcases with said flap. Making a pillowcase is pretty straightforward,
and I am sure that there are many a tutorial out there showing how to make one,
but I’ll still add my voice to the count and show my process.
I made two: one is
simple, just fabric. The other I
embellished a bit with some lace and scrap fabric.
My measurements are
for a standard pillow size of 20”x30”. You need 1 ½ to 2 yards of fabric, depending
on if your fabric has a pattern you are trying to keep in one direction.
Cut out two
rectangles: One that is 30 ½” x 20”
One
that is 39 ½” x 20”
Now you could be like
me and just start cutting without first making sure that you can get both
rectangles in one piece out of your fabric.
I don’t recommend this. Instead,
you could be smart and measure first and get two complete rectangles.
You can see in the
picture above and the close up below, I cut my shorter piece before realizing
that I needed to have my fabric the other way to get the long piece. To
remedy this I just sewed on another piece of fabric to get the length I needed.
And fixed! Since this part will be the flap on the
inside of the pillowcase it isn’t even noticeable.
Next, you sew down one
short edge on both of your rectangles. I
folded the fabric under ¼” and ¼” again, then pressed with the iron and sewed
it in place.
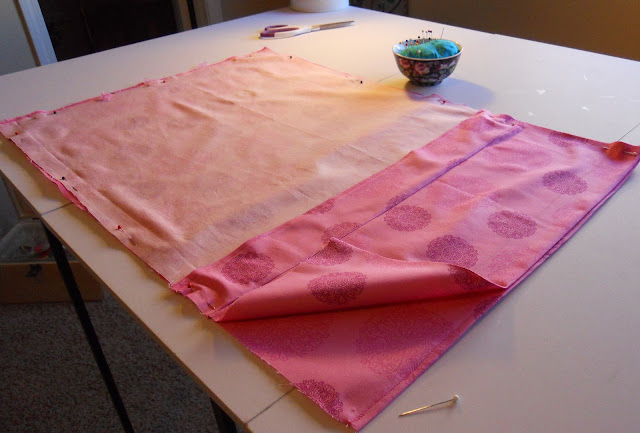
Then you take the
longer rectangle and measure down 9”.
Fold the fabric here and press it down.
This is the flap.
From here on out it’s
pretty simple. Just pine the two pieces
together with right sides facing:
Sew all around and
trim off the excess:
Turn the pillow inside
out. You could end here, but I did one
more step to sew down the raw edges at the top of the pillow right here:
Just press it to one
side and throw a little zig-zag on that bad boy.
And done! No wiggly pillow is getting out of this fortress!
For the second pillow,
all the steps are the same except where I added some embellishment. At first I was only planning on adding the
lace strip, but then I once again cut the fabric without first measuring it all
out! Grr, I annoy myself sometimes!
Anyway, this was a
happy mistake, because I had to get creative to get the right length of fabric,
and I luckily had some scraps in my stash that matched my fabric. I think the end product turned out cuter than
if I had originally planned.
To add the lace strip,
I just cut off the last 4” of my short rectangle and pressed all the long edges
down ¼” and ¼” again. Then I sewed the
lace to the underside of the longer piece:
And sewed it to the
top of the shorter piece:
I like the way the decorative
edge of the lace gives a small frill to the pillow.
Then just follow the
rest of the steps for putting it together and you’re done!
No more pillows getting
loose in the middle of the night!
Hooray!
Now go make some
pillows and have sweet dreams!


I'm going to make this today with satin fabric. Thank you for "adding your voice!"
ReplyDelete